Deviation Actions


Description
Check out and Download the Original Practice Sheet .PSD HERE.
Artist: Tim Von Rueden (vonn)
Subsurface Scattering is a natural phenomenon in which light passes through a translucent object and bounces around the interference within to create a natural “glowing” effect. The glow is caused from the light bouncing around and making the area appear more saturated by doing so.
There are plenty of examples such as holding your fingers in front of a flashlight, holding a colored gem to the sun, or even with our food such as gummy bears, jello, and fruit. Start to notice SSS from now on. See how light can create some really neat effects depending on the object and this will deepen your understanding on how light works and interacts with objects/materials!
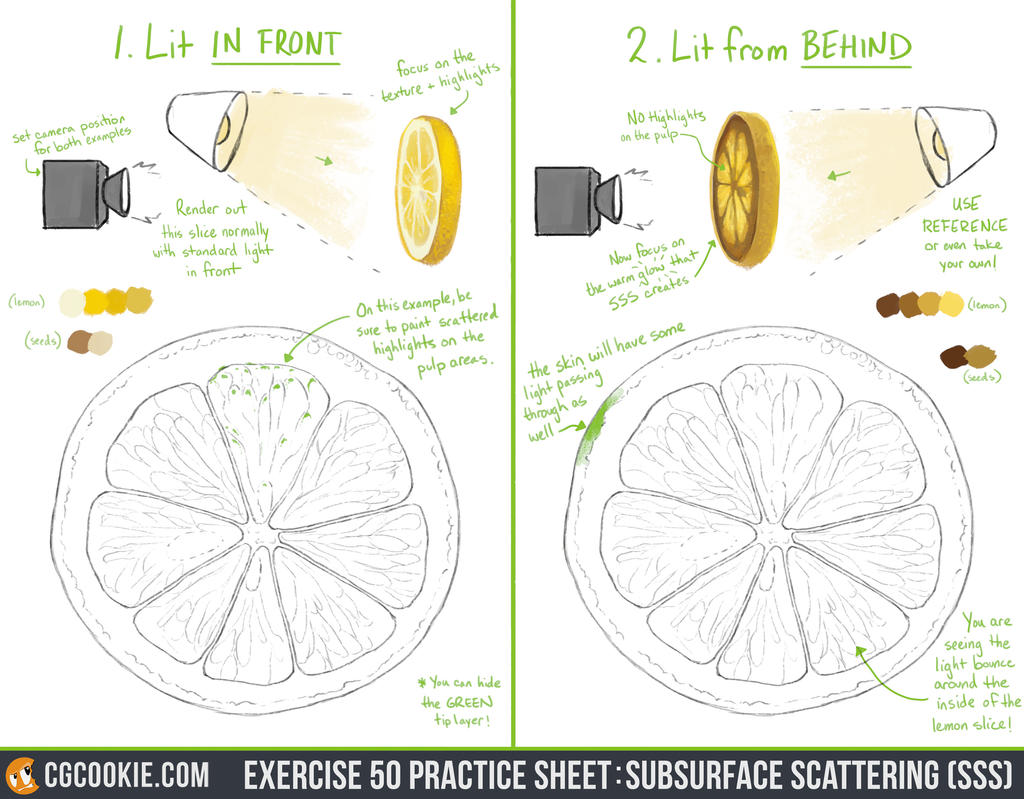
So in this example we are going to show the difference between a slice of lemon being lit from the front versus from behind. This is a great example because the lemon slice will take on completely different characteristics depending on the lighting.
- Lit in FRONT – When lit from the front, the lemon slice will be painted normally with a focus on the texture and placing the highlights with accuracy based on the angle of the lighting. I would most certainly look at references at a lemon slice to see the different color variations or buy a lemon and take your own reference!
- Lit from BEHIND – This is when the lemon magic happens. The light now passes through the slice and creates a natural “glow” effect. This is due to the light penetrating the surface and bouncing around multiple times inside before exiting and meeting our eyes. The pulp will appear more saturated and areas that don’t allow light to pass as easily such as the “white” rim of the lemon will appear darker and create more of a shadow outline. Also there will be NO highlights, and I mean zero on the pulp because the light is behind and highlights can only appear when you are on the same side of the light facing the object.
– TIPS
- USE REFERENCE. This lighting exercise is done best when you have solid reference to work from, especially for color picking!
- Treat them differently. The lemon really will have a different appearance in both lighting scenarios and you want to reflect that properly.
- Remember that SSS will create more saturated and rich colors in areas where light is able to penetrate and bounce around
- The Second example will NOT have highlights unlike the first one which will have plenty of them.
This exercise is a great and simple introduction to learning SSS and if you create it right you won’t be left feeling bitter with your lemon painting. If your looking for other material example exercises I would recommend these few below including the candy exercise which includes some SSS work with the Gummy Bear!
:origin()/pre01/5060/th/pre/i/2016/014/2/6/exercise_27_results__candy_study_step_by_step_by_cgcookie-d7pbxa6.jpg)
:origin()/pre00/189a/th/pre/i/2015/051/2/1/exercise_36_results__berries_step_by_step_chart_by_conceptcookie-d8itr4v.jpg)
:origin()/pre14/69c2/th/pre/i/2015/116/3/8/exercise_39_results__sliced_fruit_by_conceptcookie-d8qu7bx.jpg)
:origin()/pre00/dba6/th/pre/i/2016/290/3/6/painting_pumpkins_step_by_step_guide_by_cgcookie-dalcfzl.jpg)
When you finish the exercise, remember to submit the result to the “Submissions” tab on CGCookie.com. You can see other submissions alongside your own!
agataka19.deviantart.com/art/l…